Reporting Enhancements Now Available!

Overview

The enhanced reporting interface we announced a few weeks ago is now in place. Please note the following changes:

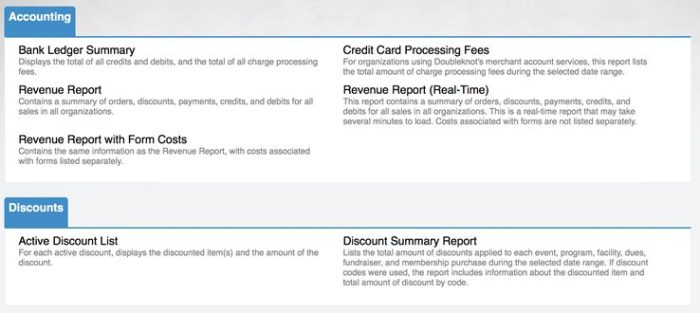
  • To make it easier to find the information you’re looking for, reports are organized into categories (like “Accounting,” “Payments,” “Attendance,” etc.), most reports have a description of their contents, and many reports have been renamed to more accurately describe their function. If you prefer the old report names, you can choose to display them instead.
  • Some reports are scheduled for removal. If a report you use frequently is in the Scheduled for Removal category, don’t worry! Just contact us at doubleknot@doubleknot.com and let us know. We will either recategorize the report or show you how to find the same information in a different report.
  • Reports will load faster! We have upgraded to the newest version of the Izenda reporting tool, and we’ve made changes to the database structure to make it faster for reports to access and return information.
  • Registration reports will now contain only the columns for data that is actually used for the event(s) or facility(ies) included in the report. For example, if none of the items included in the report use group registration, blank columns for group registration information will no longer be displayed.
  • Custom reports are in their own category at the bottom of the page. All custom reports are still available. If you or your organization created a custom report for any kind of item, it is located in the Custom category at the bottom of the list of reports.

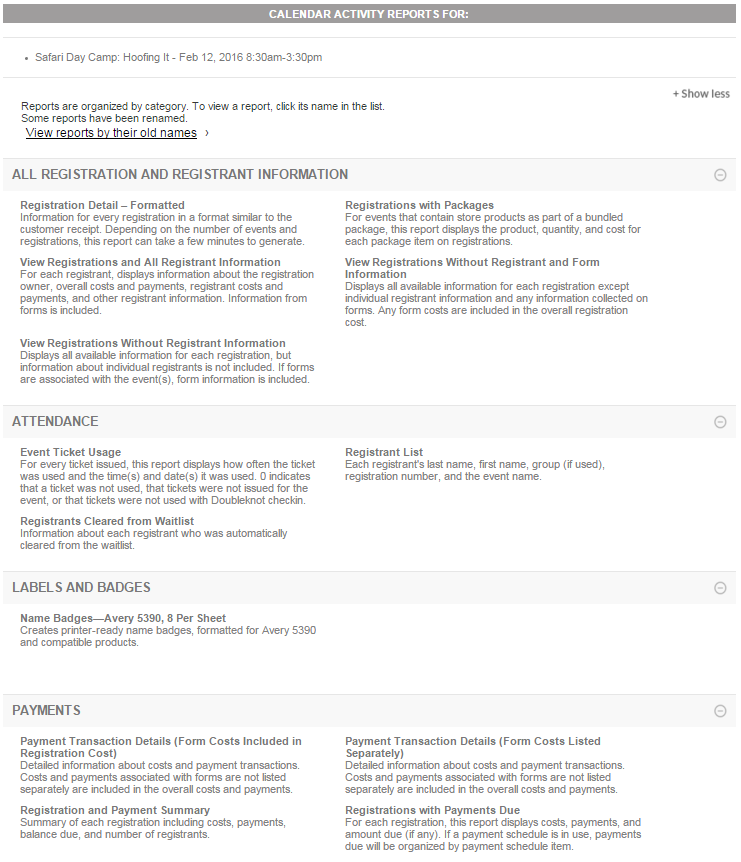
Partial list of available reports for a selected event

Accessing Reports

There are many ways to access reports. Please note that by default, reports will show their new names and descriptions. If you prefer to view the old report names, click the View Reports By Their Old Names link at the top of the page.

From the Administer Panel

In the Administer panel, click Reports. A page that contains different categories of reports (for example, Administrator Reports, Financial Reports, Calendar Activity Reports, Membership Reports, etc.) will be displayed.

  • If you selected a category for which organization-wide reports are available (such as Finance Reports), available reports will be listed by category. If further reports are available for individual items (such as memberships), a link to select items to include is displayed.
  • If you selected a category that has no top-level reports, or if you clicked the link to select individual events or memberships to include, you will be asked to select individual items to include in the report. After you select the items, a page of available reports organized by category will be displayed.

At the Top Level of Event Management

At the top level of Event Management, click Report Multiple to select exactly the items you want to include in reports. Report Multiple displays a selection screen for the items in the currently selected tab. For example, if the Programs tab is selected, Report Multiple displays a selection screen for Programs. If the Calendar Activities tab is selected, Report Multiple displays a selection screen for Calendar Activity events.

At the Top Level of Membership Management

If your organization uses the Membership Management module, click Membership Reports in the Memberships tab to select one or more memberships to include in reports.

At the Management Page for Any Item

When you’re at the management page for a specific event, fundraiser, dues, program, program sessions, or membership, click Reports in the list of options at the left to display the reports that are available for the selected item.

Financial Reports Available from Financial Accounts in Administer Panel

Financial Reports can still be accessed by clicking Financial Accounts and then selecting Financial Reports. However, you can access the same reports by clicking Reports in the Administer panel and then clicking the Financial Reports category.

Updated Izenda Interface

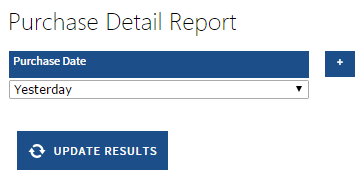
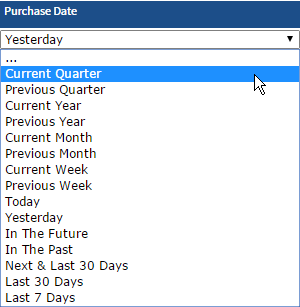
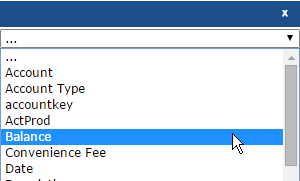
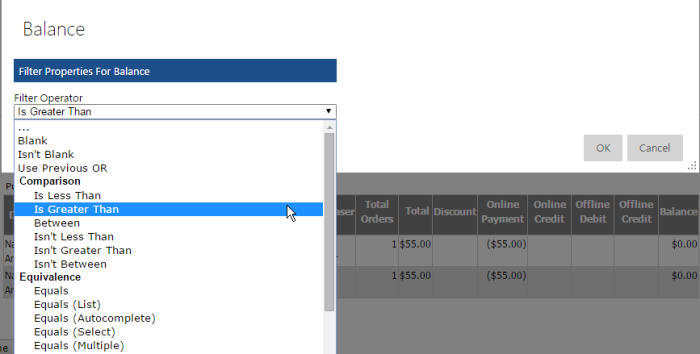
We have implemented the latest version of the powerful Izenda reporting tool. It’s now easier than ever to add fields and apply filters.

Watch the Webinar!

If you missed the webinar series, click here to watch the video online.

Applying Ad Hoc Reporting Filters in the New Izenda Interface

This article contains instructions for creating ad hoc reports in the new Izenda interface. In an ad hoc report, you can apply a range of filters to display only the data that you’re interested in, and print, export or email the results.

NOTE: The filters you apply using these instructions are not permanently saved. To permanently save changes as a custom report, use the report designer (click the pencil icon at the top of the page). Click here for instructions on using the powerful report design features.

Reports that use the Izenda interface will automatically open in a mode where you can apply the most common filters like date range, amount, etc. In the following illustration, the default filter is by Purchase Date.

Default filter for a report

DefaultFilter

  1. To select or enter parameters for a filter, follow these steps:
  • If the filter displays a menu, click the displayed menu and select the desired information (see image below).
  • If the filter displays a field, enter the text or data (such as a date in mm/dd/yyyy format) that you want to apply.
  1. Click Update Results. Only the results that match your parameters will be displayed.

Changing the Purchase Date filter to Current Quarter

UsingFilter

To add a new filter, follow these steps:

  1. Click the blue + at the right of the existing filters. A new blank filter will be displayed.
  2. In the menu below the blue border, select the data field that you want to use in the filter.
  3. Hover the mouse over the blue filter, and click the Settings icon (a gear). The Filter Properties dialog box will be displayed.
  4. In the Filter Operator menu, select the operator for the filter. For example, if you’re setting a filter for Balance, you can select Is Greater Than to limit the results to those with a balance greater than the amount you enter.
  5. Click OK to return to the report.
  6. Enter or select data in the filters, and click Update Results

Adding a filter that applies to the Balance data field

AddingFilter

Setting the operator for the new Balance filter

SettingOperatorNewFilter

To modify an existing filter, follow these steps:

  1. Hold the mouse over the blue title bar, and click the Settings icon (the gear). The Filter Properties dialog box will be displayed (see above).
  2. In the Filter Operator menu, select the operator for the filter. For example, if you’re setting a filter for Balance, you can select Is Greater Than to limit the results to those with a balance greater than the amount you enter.
  3. Click OK to return to the report.
  4. Enter or select data in the filters, and click Update Results.

When the report shows exactly the data you want, use the icons at the top of the page to print the results, export the results in the format of your choice, or email the results.

Saving the updated results as an Excel document

SaveAsExcel

Giving Tuesday is December 1, 2015

Since its creation in 2012, Giving Tuesday—an international national day of giving created to counter the consumerism of the holiday season—has grown both in popularity and in the amount of funds raised. This year, Giving Tuesday is on Tuesday, December 1, 2015.

If your organization is participating, now is the time to make sure that your online donation pages are optimized for the best donor experience on Giving Tuesday.

The easiest way to set up a Giving Tuesday page in Doubleknot is to create a Dues item in Event Management, and place a prominent link to the donation form on your home page. General guidelines for promoting Giving Tuesday include the following:

  • Promote your Giving Tuesday campaign in constituent communications and social media.
  • Display a prominent link on your home page for your Giving Tuesday donation campaign. If your organization uses Site Brander, use the DK Links feature to add the link to the Giving Tuesday donation page.
  • On the donation page, explain what the funds will be used for and how the donor’s contribution will make an impact.

Upcoming Enhancements to Doubleknot Reporting

Thanks to everyone who attended our webinars on reporting this week! Here’s a summary of the reporting-related announcements that we covered:

  • The improved reporting interface will roll out in mid-November. We will provide you advance notice of the date.
  • To make it easier to find the information you’re looking for, we are organizing reports into categories (like “Accounting,” “Payments,” “Attendance,” etc.); renaming reports; and providing descriptions of each report. If you prefer the old report names, you can click a button to display them instead.
  • Some reports are scheduled for removal. If a report you use frequently is in the Scheduled for Removal category, don’t worry! Just contact us atdoubleknot@doubleknot.com and let us know. We will either recategorize the report or show you how to find the same information in a different report.
  • Reports will load faster! We have upgraded to the newest version of the Izenda reporting tool, and we’ve made changes to the database structure to make it faster for reports to access and return information.
  • Registration reports will now contain only the columns for data that is actually used in event configuration. For example, if you’re not using group registration, the group registration information columns will no longer be displayed.
  • We will publish comprehensive documentation on reporting including an index of every field that may be displayed on every report.

Reports will be organized by category and display a meaningful description. This is an example of the Accounting and Discount reports that are available from the Administer panel. 

DK_SampleReportCategories

Additional Reporting Webinars are Scheduled!

Because of technical difficulties during this morning’s webinar about Doubleknot reporting enhancements, several registrants were not able to join the webinar. We know that this was frustrating, and we apologize for the inconvenience.

If you were unable to sign in to the Tuesday webinar, we are offering two more sessions this week:

In addition, you can click here to view of video of today’s webinar.

Again, we are very sorry if you were unable to sign in to the webinar, and we hope you’ll take the opportunity to sign up for another session.