Understanding Price Groups and Payment Schedules

With summer camp registration and property reservations starting soon (or already in progress!), we recommend reviewing the procedures for setting price groups and payment schedules. These powerful tools ensure that your registrants are charged the correct costs and have flexible payment options.

To learn how to use Price Groups/Schedules effectively, the following resources are available:

  • Online help. To view the searchable online help, click Help at the top of any Doubleknot page. To make the Price Groups/Schedules information easy to find, there’s a special section on the Contents page.
  • Printable manuals. To view all printable Doubleknot documentation, click User Manuals in the Administer panel. The following updated user briefs contain instructions for using the Price Groups/Schedules feature. In addition, the information is included in the Creating and Editing Calendar Activities Events User Guide and the Creating and Editing Programs User Guide, which provide comprehensive documentation for each module.
    • Setting Up and Assigning Price Groups for Calendar Activity Events (User Brief)
    • Setting Up and Assigning Price Groups for Programs (User Brief)
    • Changing Facility Prices on Scheduled Dates (User Brief)
    • Changing Membership Prices on Scheduled Dates (User Brief)

And, if you’re using payment schedules, don’t forget to set up custom payment reminders! For more information, review the Event Payment Reminders user brief on the User Manuals page or the instructions in the online help.
Applying Ad Hoc Reporting Filters in the New Izenda Interface

This article contains instructions for creating ad hoc reports in the new Izenda interface. In an ad hoc report, you can apply a range of filters to display only the data that you’re interested in, and print, export or email the results.

NOTE: The filters you apply using these instructions are not permanently saved. To permanently save changes as a custom report, use the report designer (click the pencil icon at the top of the page). Click here for instructions on using the powerful report design features.

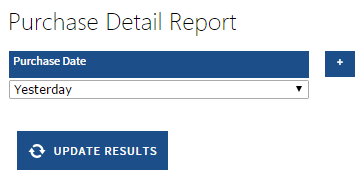
Reports that use the Izenda interface will automatically open in a mode where you can apply the most common filters like date range, amount, etc. In the following illustration, the default filter is by Purchase Date.

Default filter for a report

DefaultFilter

  1. To select or enter parameters for a filter, follow these steps:
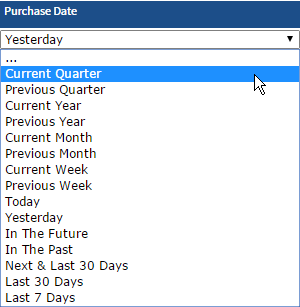
  • If the filter displays a menu, click the displayed menu and select the desired information (see image below).
  • If the filter displays a field, enter the text or data (such as a date in mm/dd/yyyy format) that you want to apply.
  1. Click Update Results. Only the results that match your parameters will be displayed.

Changing the Purchase Date filter to Current Quarter

UsingFilter

To add a new filter, follow these steps:

  1. Click the blue + at the right of the existing filters. A new blank filter will be displayed.
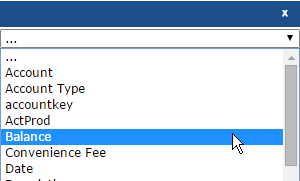
  2. In the menu below the blue border, select the data field that you want to use in the filter.
  3. Hover the mouse over the blue filter, and click the Settings icon (a gear). The Filter Properties dialog box will be displayed.
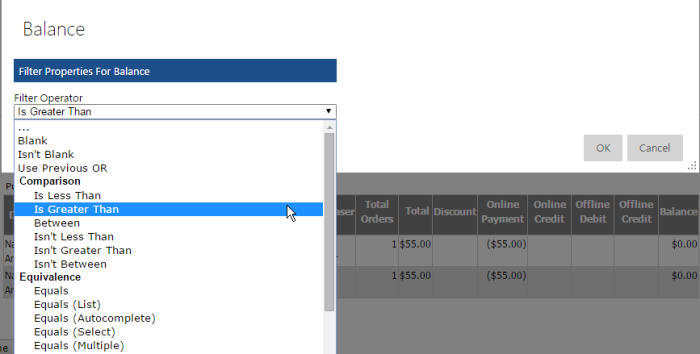
  4. In the Filter Operator menu, select the operator for the filter. For example, if you’re setting a filter for Balance, you can select Is Greater Than to limit the results to those with a balance greater than the amount you enter.
  5. Click OK to return to the report.
  6. Enter or select data in the filters, and click Update Results

Adding a filter that applies to the Balance data field

AddingFilter

Setting the operator for the new Balance filter

SettingOperatorNewFilter

To modify an existing filter, follow these steps:

  1. Hold the mouse over the blue title bar, and click the Settings icon (the gear). The Filter Properties dialog box will be displayed (see above).
  2. In the Filter Operator menu, select the operator for the filter. For example, if you’re setting a filter for Balance, you can select Is Greater Than to limit the results to those with a balance greater than the amount you enter.
  3. Click OK to return to the report.
  4. Enter or select data in the filters, and click Update Results.

When the report shows exactly the data you want, use the icons at the top of the page to print the results, export the results in the format of your choice, or email the results.

Saving the updated results as an Excel document

SaveAsExcel

New and Updated Documentation

The following documentation is now available:

  • NEW: Creating and Editing Facilities (User Guide)
  • NEW: Reservations Based on Facility Reservations (User Guide)
  • NEW: Setting Gift Membership Options (User Brief)
  • NEW: Setting Facility Booking Windows (User Brief)
  • NEW: Document Library (User Guide)
  • UPDATED: Global Event Configuration Settings (User Brief)
  • UPDATED: Communications Center (User Guide)

To view a list of available documentation in PDF format, click User Manuals in the Feature List. To view the searchable online help (which contains the same information as the PDF manuals), click Help at the top right of any page.

Required Permissions for Posting Balance Adjustments

If you’ve been redirected to the Feature List when the Adjust Balance page should be displayed (e.g., when you click Adjust Balance on the Payment Details page, or after your enter a new registration or reservation), your account may not have the required permissions to post adjustments for all of the items in the order.
To post adjustments to events, facilities, and programs, you must have read-level permission or higher in the organization that contains the store. (For most Doubleknot clients, the store is located in the master organization.) These permissions are in addition to your permissions for events, facilities, and programs in the organization where the registration or reservation is located.
The following table explains the required permissions:
Posting adjustments to: Requires read-level permissions in the store’s org for:
Calendar Activities, Dues, and Fundraisers Manage Events
Facilities Facilities Management
Programs Program Management 1 and
Program Management 2
 Please contact your local Doubleknot administrator to make sure that your account has the permissions you need.  Information about assigning permissions can be found in the Managing Member Profiles User Guide or in the Managing Member Profiles section of the online help. (To view online help, click Help on any Doubleknot page).

Watch the Webinar about the new Price Groups/Price Schedules feature

If you missed this week’s webinar about the new Price Groups/Price Schedules feature, you can watch the video to learn about its benefits and best practices for using price groups and price schedules for events, programs, memberships and reservations.

Click here to watch the webinar!

Powerful New Interface for Price Groups and Price Schedules

We’ve released a major enhancement to price groups and price schedules, with even more powerful features to control pricing for events, programs, memberships, and facilities. If you use price groups anywhere in Doubleknot, or if you want to schedule automatic price changes on a specified date, it’s very important that you read the documentation for the feature before you use it!

To make it easy to find this important information quickly, there’s a new section on the contents page of our online help called “Price Groups and Price Schedules.” The section has shortcuts to the price groups and price schedules information for events, programs, memberships, and facilities.

To view our searchable online help at any time, click Help at the top of any Doubleknot page after you’ve logged in.