NNRYCaseStudyBanner

A registered National Historic Landmark located in Ely, Nevada, the Nevada Northern Railway Museum (NNRY) maintains the original railway locomotives, rolling stock, track, passenger station and buildings that served the historic copper mining region of Central Nevada for over a century. As the best-preserved example of a standard-gauge short-line in North America, NNRY has received multiple tourism awards and has been featured in seven episodes of The History Channel show American Restorations.

After using Altru for six years, NNRY sought an integrated solution that better met their needs for ticketing, reservations, memberships, donations and merchandise sales, including reservations and discounts for multi-night lodging.

Selecting the right system would lay the groundwork for NNRY’s continued growth and success. NNRY selected Doubleknot.

Since implementing Doubleknot, NNRY reports:
  • A 400 percent increase in online donations with a donation request integrated into the checkout process
  • A 33 percent increase in reservations
  • An overall upward trend in revenues booked online compared to call-in sales

Read the complete case study here!

Best Practice: Use Integrated POS/MPOS for On-Site Sales

Offer everything online and at your site with Doubleknot nonprofit POS/MPOS

Admission-based nonprofits are unique, with enterprise-level requirements for ticketing, registrations and reservations as well as nonprofit-only needs like fundraising and membership management.

But, most POS solutions are designed for the for-profit entertainment industry, and don’t easily support the additional ways that nonprofits generate revenue. If your ticketing, admissions and retail sales aren’t fully integrated with your membership, registrations, reservations and donations, you might face the following problems:

  • You have to configure everything in two systems: one for online purchases and one for payments at your site.
  • Fees may be higher. Generic payment solutions can have less favorable terms than the ones you’ve already negotiated.
  • Because payments are recorded in another database, you have to manually consolidate sales and registration information from different systems for accounting.
  • You can’t access purchases that a customer already made online, so you can’t update registrations or collect outstanding payments and have the information automatically updated in your records.

In addition, separate payment solutions fail to capture every constituent interaction in a single database for reporting and analytics.

To empower our clients to save time and money, Doubleknot offers Sales Station, a complete front-desk/front-gate/retail POS solution with support for industry-standard peripherals like ticket printers, receipt printers, scanners and more. With Doubleknot and Sales Station, you set up everything you offer to the public once, and it’s available for sale directly to customers through a web browser, or at your site at a Sales Station register.

And, the Sales Station mobile app for iOS delivers the flexibility of a mobile payment system with the power of our integrated database so you can sell and validate tickets, update registrations, collect donations and sell merchandise anywhere. The Sales Station app for iOS eliminates the need to set up an unrelated system for mobile sales, which saves money on processing fees as well as administrative time to set up and reconcile different systems.

So, no matter it’s purchased, every admission ticket, special event, camp and class registration, birthday party reservation, field trip, membership purchase or donation is recorded in a single integrated database with comprehensive analytics and reporting tools for a 360-view of your constituents.

With Doubleknot and Sales Station, you can:

  • Add easy-access buttons to the Sales Station screen for any event, reservation, membership, merchandise or donation
  • Add anything to a purchase (even if it’s not assigned to a button) with a few simple taps
  • Reduce wait time and speed admissions by using the Sales Station app on iPads and iPhones as a pop-up ticket or membership booth
  • Look up registrants and attendees, update registrations and collect payments anywhere
  • Ask for donations to support an exhibit as visitors exit, and accept donations at special events on or off your site
  • With roaming membership sales, convert visitors to members and credit the cost of today’s admission against the membership price
  • Go Green with our optional paperless solution that includes electronic signature capture, electronic receipts and mobile ticket delivery and display!

Support for the Sales Station mobile app for iOS
is included in every Doubleknot subscription!

Call us at (408) 971-9120 x203 or visit
hello.doubleknot.com to learn more and request a demo

Why Generic Plug-In Credit Card Readers are a Poor Choice for Nonprofits

Your Nonprofit Isn’t Generic. Don’t Rely on a Generic Payment Solution!

Doubleknot Sales Station is the best mobile POS for nonprofits.

Using Square or a similar solution for collecting in-person credit card payments may seem like a good idea, but the truth is, generic solutions can cause very real problems:

  • You have to configure everything in two systems: one for online purchases and one for payments at your site.
  • Fees may be higher. Generic payment solutions can have less favorable terms than the ones you’ve already negotiated for your online sales.
  • Because payments are recorded in another database, you have to manually consolidate sales and registration information from different systems for accounting.
  • You can’t access purchases that a customer already made online, so you can’t update registrations or collect outstanding payments and have the information automatically updated in Doubleknot.

The Doubleknot Sales Station app for iPads is the only fully integrated mobile point-of-sale designed specifically for nonprofits. With Sales Station, you can sell merchandise, sign up new members, collect donations and book new registrations and reservations anywhere.

You can even look up an existing registration, update the information and collect outstanding payments on the spot. And because Sales Station is fully integrated with Doubleknot, every piece of information is automatically stored in the single, unified database.

Every Doubleknot subscription includes the use of Sales Station at no additional cost, so if you’re already a client, there’s no reason to delay. Let us know that you’re interested, and we’ll get you started right away.

If you’d like to learn how Doubleknot’s integrated online, on-site and mobile solutions for nonprofit ticketing, admissions, registrations, reservations, memberships and fundraising can help your organization,  please let us know!

New Summer Camp Reports for Group Signup Programs

We are pleased to release three new reports to help streamline summer camp management for group signup programs including scout camps:

  • All Session Events – Roster. For each session event/merit badge class in the selected session, this report displays the name of each registrant and information about their group.
  • All Session Events – Roster with Completion Requirements. For each session event/merit badge class in the selected session, this report displays the name of each registrant, group information and the course completion requirements assigned to the session event/merit badge class.
  • All Session Events By Group. This report displays each registrant’s session event/merit badge class schedule, organized by group/unit.

To display and print these reports, follow these steps in Event Management:

  1. In the Programs tab, click the program you’re working with. The Manage a Program page will be displayed.
  2. At the bottom of the panel, click the session for the reports you want to view. The Manage a Program Session page will be displayed.
  3. On the left, click Reports. The Program Session Reports page for the session will be displayed. The reports are located in the Attendance section.
  4. Click the report that contains the information you want to view. The report will be displayed.
  5. To create a printable PDF that contains a single page for each session event/merit badge class, click the printer icon at the top of the report and select HTML-Powered PDF.

If you have any questions, please let us know at Doubleknot@doubleknot.com.

NEW: Improved Analytics for Events and Facilities

To make our standard reports for Facilities and Event Management more comprehensive, we’ve made the following fields available for you to add to custom reports:

  • Categories. For all Event Management items, this field displays the categories assigned to the registration or reservation.
  • Unit of Booking. For all reports that contain information about facility reservations, this field displays the unit of booking for each facility.
  • Number of Booking Units. For all reports that contain information about facility reservations, this field displays the length of the reservation. For example, if the unit of booking is “overnight” and the reservation is for two nights, this field would display “2”.

If you have any questions, please let us know at Doubleknot@Doubleknot.com.

Resolving Overflow Errors in Custom Reports

Some Doubleknot fields contain numeric identifiers. For example, the Registration field contains the registration number for the order. When you add a field containing identification numbers (like Registration) to a report, make sure that the report does not generate a subtotal for the contents of the field. Subtotaling the contents of identification numbers doesn’t yield useful information and can cause Report Writer to display an error message.

If your custom report generates the error message in the image below, the report is most likely attempting to generate the sum of a field that contains identification numbers.

This error message may be displayed if you perform mathematical functions
on fields containing identification numbers.

ErrorMessage

To resolve this error easily, follow these steps:

  1. Click the Report Designer icon to open the report designer.
  2. In the Fields tab, locate any field in the report that contains identification numbers, like Registration # or ActivityKey.
  3. Click the Advanced Field Settings icon at the end of the row. Options for advanced field settings will be displayed.

Click the Advanced Field Settings icon

2016-05-05 13_30_34-Report

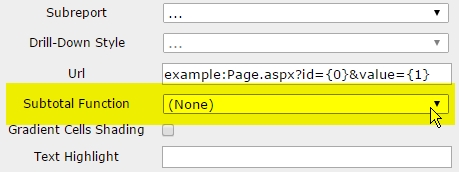
  1. In the Subtotal Function menu, select None. This ensures that no mathematical functions will be applied to the identification numbers.

Make sure the Subtotal Function setting is None.
(
This image displays only a portion of the advanced field settings dialog box.)

SubtotalFunctions

  1. Click OK to save the changes to the field settings.
  2. Click Preview. The report should be displayed. If you continue to receive the error message, return to the report designer and make sure that no other fields with identification numbers are being subtotaled.
  3. Save your changes to the report.

If you have questions, let us know at Doubleknot@doubleknot.com.


You Asked, We Listened: No Legacy Reports Will Be Removed

We’re happy to announce that at your request, we are not removing any of the older reports that were categorized as “Scheduled for Removal.” Instead, these reports are located under the heading “Legacy Reports,” where you can continue to use them. If you’d like to learn how to address your reporting needs with the newer reports, please let us know at doubleknot@doubleknot.com.


Changing the Posting Period to Date Range on Revenue Reports

By default, the Revenue Report will automatically display data with a posting date of yesterday. Follow the steps in these two procedures to display data for a different time period or a custom date range.

To display data for a specific time period (such as “last quarter”), follow these steps.

  1. Click the Posting Date menu.
  2. Select the desired time period.
  3. Click Update Results. Results for the selected time period will be displayed.

To display data for a specific date range, you will change the operation of the Posting Date filter so that you can enter or select dates. To change the filter so that you can select a custom date range, follow these steps:

  1. Place the mouse pointer over the blue Posting Date title bar so that the options are displayed.

Displaying options for the Posting Date filter

  1. Click the settings icon (the gear). The Filter Properties for Posting Date will be displayed.
  2. In the Filter Operator menu, select Between(Calendar).

Selecting Between(Calendar) so you can enter a range of dates

  1. Click OK. The Posting Date filter will now display two fields where you can enter or select the date range.
  2. Enter or select the desired date range.

The Posting Date filter now lets you enter or select the desired date range

  1. Click Update Results. Results for the date range will be displayed.

Saving Your Changes as a Custom Report

If you’ve made changes to the report that you like, such as changing column widths, setting filters and/or adding column totals, you can save your changes in a custom report. To do so, follow these steps:

  1. Set the desired filters and field properties.
  2. In the toolbar at the top left of the report, click the Report Designer icon (the pen, which is the last icon in the toolbar). The Report Designer will be displayed.

Clicking the Report Designer icon

  1. In the second row of the Report Designer toolbar, click Save As… A dialog box to enter the report name will be displayed.
  2. Enter a new name for the report.
  3. Click OK. When you return to the report list, your customized report will be in the Custom category at the bottom of the page.

Custom reports are located in the Custom category in the report list

Adding the Total to a Column in Report Writer

A common task is adding up the contents of a column to determine the total registration cost, total payments and adjustments, total amount of discount, etc. To add the total to the bottom of any report column, follow these steps:

  1. At the far top right of the report, click the Fields tab. Field information for the report will be displayed.
  2. In the panel on the right, select the field to work with. In this example, we will add the total amount to the Registrant Cost column to see the total dollar amount of registrant fees that will be collected for the event.

Selecting Settings for the Registrant Cost field

  1. Click the Settings icon (the gear) at the right. The Field Properties dialog box will be displayed.
  2. Select Total.
  3. Click OK to dismiss the dialog box.

Adding the total to the Registration Cost column

  1. Click Update Results. The report will be displayed and the total amount of the Registration Cost column will be at the bottom of the column.

When the Total property is added to a field, the sum of the displayed data is placed at the end of the column. In this example, we’ve added the Total property to the Registration Cost field as well as the Payments and Adjustments field.

Totals for Registration Cost and Payments And Adjustments column are displayed

NOTE: The total is the sum of all displayed data. So, if you show a subset of the data using a filter, the total at the bottom of the column is the total for the displayed rows only.